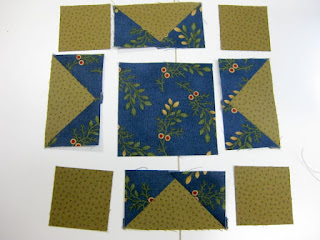
This is a block I recently put together for my friend Kristi's Birthday. Following the rules of our sewing group, she provided the instructions and the fabric for each of us to sew and complete one block for her. When all is said and done, you end up with a 6 1/2" unfinished sawtooth Star block.
This turned out to be so much fun, that I had to sew one up with my own color choices. I started by cutting all the pieces:
- From the center Star fabric: cut one 3 1/2" square.
- For Star points: cut eight 2" squares.
- Then from the background fabric: cut four 2" x 3 1/2" rectangles and four 2" x 2" squares.
Make four Flying Geese units:
- Draw a diagonal line from the corner, on the wrong side of the eight 2" Star fabric squares.
- Align a marked 2" Star fabric square with one end of a 2" x 3 1/2" background fabric rectangle.
- Sew on the marked line.
Maintain the correct placement of the pieces by chain stitching them - butting each one up against the other.
Trim, leaving a 1/4" seam allowance. Press this unit open, the seam will be towards the darker fabric.
Repeat the process, adding the second set of 2" squares and overlapping the first set. Press the unit open, again with the seam toward the darker fabric. This completes your Flying Geese units.
Trim, leaving a 1/4" seam allowance. Press all units.
Lay out your pieces in their correct orientation to each other in order to begin sewing the block together.
I have found this sequence of pinning to be very helpful. It keeps both the edges from shifting, as well as the seams aligned as I sew.
Voila! A beautiful block. After seeing it finished, I decided to add a small 1 1/4" inner border, a 2 1/2" outer border and make it into a small quilt.
I machine quilted with my Bernina sewing machine, using the Walking Foot. I often 'mark' or establish my quilting lines using blue Painter's tape. I found that the same piece of tape can be used again and again on the same project.
After quilting, it's time to 'Square-up' the piece.
- Machine baste 1/4" from the edges of the top fabric, to stabilize all the layers.
- Use both a horizontal and a vertical seam line for alignment with your straight edge.
- trim only on the right outer edge of your straight edge, turning the quilt to work on all four sides.
It's very important to note: if you use the edge of the quilt top fabric to align your straight edge, you are only cutting off the excess fabrics and
not 'Squaring-up' your work.
To illustrate, this photo shows that your fabrics sometime shift a little in the quilting process. But 'Squaring-up' helps to correct the alignment of the entire quilt. Adding the binding usually covers most of your 'corrected' areas.
For binding, I like to use Thimbleberries' Lynette Jensen's formula. She has you cutting 2 3/4" pieces for your binding strips, and sew the binding to the quilt using a 3/8" seam allowance. This measurement will produce a beautiful 1/2" wide finished binding.
And here is the finished little quilt. I was very pleased with the results. Thanks so much Kristi!


