Showing posts with label Bernina. Show all posts

Tuesday, May 14, 2013

On and On . . . about Modern Quilting


A few weeks ago, I ran across an article in a Bernina newsletter that I subscribe to.
I was so excited to see a brief tutorial about how to use the 'Running Stitch' on any domestic sewing machine to achieve the mechanical look that so many
Modern Quilters are enjoying now.

Here is a link to the tutorial:
http://weallsew.com/2013/03/29/quilting-with-the-running-stitch/


Using  a Walking Foot, with the Guide attached, it's easy to keep the distance between each row of quilting the same. (i.e. the Guide allows you to maintain an easy reference point for each row.)

I enjoyed seeing how the rows of stitching were lining up as I went along.

But when I got to the step of putting the binding on,
it started to bother me that the quilting stitches were not lining up with all of the edges.

I can see, where it makes sense that they wouldn't. Given that the quilt had been randomly pieced to achieve that highly coveted "Wonky" look of a Modern Quilt  and I had used one of those seams as a reference point to begin quilting.
In spite of the fact that, I had squared-up the quilt before beginning.

My first instinct was to try to correct this in some way. 
One thing I tried, was to run a machine Basting Stitch down one edge, 
coming further in on the quilt - to see if any type of 'straightening' was possible at this time.
And of course, that made little or no difference at all.
So, . . .
the lesson here is I think, 
if you are a long-time quilter, possessing all of the Traditional Quilting rules of expectation,
when using this new method of construction and quilting,
you are just going to have to let everything go!
I personally love this 'free-fall' method.

Once I tried this method of quilting, I was ready to move on to something that was more of a challenge. 
I did find that having to line up each and every row of stitching 
quickly became monotonous for me. 
I could not image ever finishing a larger quilting project employing this method.
But, that's me. 
Time to move on . . . 


Saturday, December 3, 2011

An easy block to begin with

This is a block I recently put together for my friend Kristi's Birthday. Following the rules of our sewing group, she provided the instructions and the fabric for each of us to sew and complete one block for her. When all is said and done, you end up with a 6 1/2" unfinished sawtooth Star block.


 This turned out to be so much fun, that I had to sew one up with my own color choices. I started by cutting all the pieces:
  • From the center Star fabric: cut one 3 1/2" square.
  • For Star points: cut eight 2" squares. 
  • Then from the background fabric: cut four 2" x 3 1/2" rectangles and four 2" x 2" squares.

Make four Flying Geese units: 
  • Draw a diagonal line from the corner, on the wrong side of the eight 2" Star fabric squares. 
  • Align a marked 2" Star fabric square with one end of a 2" x 3 1/2" background fabric rectangle. 
  • Sew on the marked line.

Maintain the correct placement of  the pieces by chain stitching them - butting each one up against the other.


 Trim, leaving a 1/4" seam allowance. Press this unit open, the seam will be towards the darker fabric.


 Repeat the process, adding the second set of 2" squares and overlapping the first set. Press the unit open, again with the seam toward the darker fabric. This completes your Flying Geese units.

Trim, leaving a 1/4" seam allowance. Press all units.

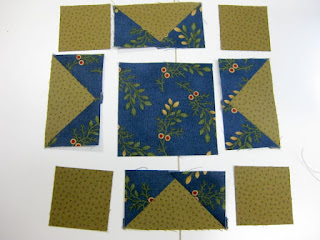
Lay out your pieces in their correct orientation to each other in order to begin sewing the block together.

I have found this sequence of pinning to be very helpful. It keeps both the edges from shifting, as well as  the seams aligned as I sew.

Voila! A beautiful block. After seeing it finished,  I decided to add a small 1 1/4" inner border, a 2 1/2"  outer border and make it into a small quilt.

I machine quilted with my Bernina sewing machine, using the Walking Foot. I often 'mark' or establish my quilting lines using blue Painter's tape. I found that the same piece of  tape can be used again and again on the same project.

After quilting, it's time to 'Square-up' the piece.
  • Machine baste 1/4" from the edges of the top fabric, to stabilize all the layers. 
  • Use both a horizontal and a vertical seam line for alignment with your straight edge. 
  • trim only on the right outer edge of your straight edge, turning the quilt to work on all four sides. 
 It's very important to note: if you use the edge of the quilt top fabric to align your straight edge, you are only cutting off the excess fabrics and not 'Squaring-up' your work.

To illustrate, this photo shows that your fabrics sometime shift a little in the quilting process. But 'Squaring-up' helps to correct the alignment of the entire quilt. Adding the binding usually covers most of your 'corrected' areas.

For binding, I like to use Thimbleberries' Lynette Jensen's formula. She has you cutting 2 3/4" pieces for your binding strips, and sew the binding to the quilt using a 3/8" seam allowance. This measurement will produce a beautiful 1/2" wide finished binding.

And here is the finished little quilt. I was very pleased with the results. Thanks so much Kristi!